Wednesday, March 13, 2013

Deal or No Deal Birthday card

Some friends of ours have a son with some disabilities.  Bryan is one of the coolest kids I have ever met.  He is very lucky to have parents that can see to his every need personally and financially.  The last time we were over at their home, Bryan wanted me to play Deal or No Deal with him on his computer.  So for his 13th birthday, I decided to use that as the theme.  I used 3 Birds on Parade for the suitcases and Cricut font for the words.  I embossed the inside words on the suitcase.  I hope you like it.


Tuesday, March 12, 2013

Graphic 45 French Country Recipe Book

I love Graphic 45 and decided I wanted to do a recipe book with the new French Country line.  I used Letter Envy in Cricut Craft Room for the lettering on Bazzill card stock.  I used five different stickle colors on the sunflowers and diamond glaze on the chicken and a few other pieces throughout the book.  I plan on putting the recipes I received when my DH and I took a cooking class on one of our trips to Paris.  I hope you like it.


For the front of the book, I cut thick chipboard (book board) at 9 1/2" X 9 1/2".  Covered it with the blue striped paper, attached the cut out of the chicken and sunflowers from paper included in the paper pack, cut a 1 1/2" border from paper included in the pack on the edge and attached it to the edge so the cut edges of the chicken and sunflower weren't so obvious.  I added a little piece of lace on the very edge.  "Recettes" is french for recipes and that was cut using CCR/Letter Envy and attached also.  I stickled the sunflowers, leaves, and stems and diamond glazed the chicken.  I also used some Stampin Up pens to bring out the color of the beak and tongue.


The first page inside is for hors d'oeuvres (appetizers).  Again the Joie de Vivre (Joy of living) with the sunflowers was cut out of paper in the pack and the flowers were stickled.  I edged the page in Washi tape from We R Memory product.


Les Entrees (main meals) is next.  The le Jardin (the garden) and chicken cut outs are from the paper pack. 


Les Plats (the dishes) are what I consider one pot meals.  I have a French Cooking cookbook that has a section like this and it has some wonderful recipes in it.  The hay, door, and window were diamond glazed. 


Les Legumes (beans, seeds, some grains).  Sunflower square is a cut out and stickled.  I cut out the haricots and stamped the area with Paris and the address.  I diamond glazed the beans. 


Les Sauces (sauces, gravies, etc.)  I love bechamel sauce and learned how to make it while at the cooking class in Paris.  So I definitely had to include a sauce section.


Les Desserts (desserts).  What can I say but the french know desserts.  The fruit cut outs were also in the paper pack. 


The front and back inside covers were the sunflower papers.  I did not stickle these pages.


The back cover to match the front. 


Saturday, March 2, 2013

Travel Journal for Japan/China

Update:  We have returned from our trip and my journal is full of writing.  I need to include some of my pics that I took into the photo spots.  I did include a Cricut cut from Something to Remember on the first page.  This is the page that I keep all my tickets, ephemera from our trip.  Just thought I would add the update here.


My DH has to go to Japan and China for work and I'm going to tag along.  I love to journal while traveling.  I usually take lots of photos but have a tendency not to scrap them after I get home.  I have decided to start incorporating the photos into my journals.  This is my journal for the Japan/China trip.  I used the Teresa Collins folders, double-sided card stock, envelopes, and stickers.  I used Bo Bunny photo sleeves and lined paper, and some Washi tape.  I stamped with Graphic 45 Bird Song stamps.  I scored the folders, cut and scored the card stock and adhered them with score tape to create the journal.  I hope you enjoy.


Once the dates are confirmed I will add them to the front of the book.

I usually keep my tickets and journal about my flights


I used one of the envelopes to insert a journaling page.  The photo sleeve on the right is a little hard to see.  


This embellishment is in the envelopes.  I inserted tags stamped with Graphic 45 Bird Song stamps.  I added spots on the next page for pics.


Just another shot of the hard to see photo sleeve.


Journal page and opposing photo sleeve.


Stickers added to card stock (journaling page) with another photo sleeve.


Picture page and journal page.


I loved how the Bo Bunny lined paper worked with the Teresa Collins Far and Away line.


This is the smallest folder in the set.  I sewed a photo sleeve and coordinating card stock to this folder.


Photo sleeve and journal page


Back side of sewn folder


Picture page and journal page


Journal page and picture page


Photo sleeve and journal page


Journal page and photo page


Back of book


Last two pages.  I figured I could add mementos and more journaling.


Tuesday, February 26, 2013

St. Louis Cardinals Book for my Niece

I know its been a while since I lasted posted.  I started on a Graphic 45 project and then got sick.  I really hate being sick, I just don't have any energy or insight.

I received an invitation to my nieces baby shower so I needed to get busy.  My niece is having a baby boy after having two girls.  Her shower is being held this weekend in St. Louis at her new home.  Since I live in Phoenix and will be traveling quite a bit this year, I couldn't make it to the shower.  I asked her if they had a theme for Timothy Patrick Jr. and she said the St. Louis Cardinals.  I found some digi paper on Etsy and ran off the pages on my Epson R1900.  The bird on the front was cut at my LSS using a Zing cutter and the baseball teams logo.  I then painted it with acrylic paint and used Glossy Accents on the black outline.  I used my Cricut Baseball cart, Everyday Paper Dolls cart, and Tags, Bags, Boxes, and More cart all in CCR.  I included some stickers that I purchased also.  I will be mailing it to her tomorrow along the with gift card holder card that I made.  I made the envelop for it using my new Envelop Punch Board.  So far so good with the board.  I hope you enjoy it.

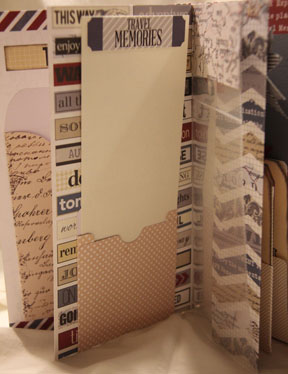
This is the inside of the gift card holder card.  It's not the best picture but I couldn't get it to stand up to show the inside.  Basically, you cut a piece of cardstock 11" X 5".  Score at 3 3/4", 5 1/2", and 7 1/4".  Fold to look like a "W".  Scor tape the edges only (should look like a big U) and seal.  Measure the size of your gift card and make small incisions.  Then score 1/8" along the edge, between the two incisions only.  Cut away the scored card stock.  This will leave you with an opening to insert your gift card.  I hope that these instructions are clear.


This is the front of the book.  I cut out his first name in CCR on flags (I don't remember which cart I used) then adhered them with ribbon to look like a banner.  I used the Cinch coil to bind the book.


This is the front of the card.  The stamp is from CTMH.  I smudged some ink on the front so I covered it with a bow.


I used the baseball diamond cut to hold covered chipboard pieces.


This cut was from the Baseball cart.


More covered chipboard for pictures and journaling.  I found the Cardinals logo online and printed it to cover the little flag in the corner.


This is inside the front of the book.  Cut from Baseball again.


I used the cutouts from the Baseball cart to cover the front on the tag.  The back can be used for a picture or journaling.


The card frame from Baseball.  I adhered some ribbon and used a Queen and Co. star inside the star cutout.


More Queen and Co. embellishments.  Since he has two sisters at home, I used two yellow flowers to represent them in the Home Team!


I made a pocket to hold more covered chipboard.  Embellished with stickers that I popped.


Again with two yellow pinwheels to give his sisters some representation.


I used Everyday Paper Dolls to cut out this little guy at 4".  I love this page.


Some ribbon embellishment.


Rookie of the Year sticker and embellishments for the newest member.


The pitcher was cut using Baseball.


One of my favorite pages.  I used Baseball to cut out the slider and stickers to embellish


Not crazy about the puffy paint but couldn't take it off without ruining the page.


I made a belly band, added the bat sticker, and popped a painted/decorated chipboard circle to hold the covered chipboard.  I upcycled a coffee cup band and used it as a pull on the chipboard.