
Wednesday, July 31, 2013
August - Cricut Something To Remember Cart Project
Saturday, July 20, 2013
Birthdays
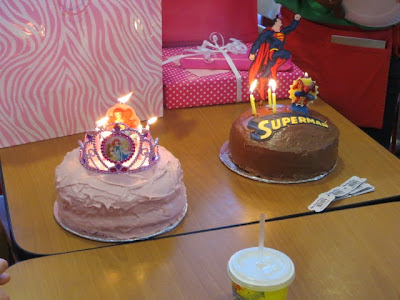
I have three grandchildren and all three of them have birthdays within 20 days of each other. My youngest is Nico and he just turned 4. Ayva is the oldest and she will be 6 next week. Then Kingston is the middle and he will be 5 exactly one week after Ayva. Nico and Ayva are brother and sister so my son and his ex always do one party for the both of them. Grandma (that's me) always makes the cakes from scratch. This year, Nico wanted a chocolate cake with Superman and Ayva wanted a strawberry cake for a princess crown to be put on top. So yesterday, I turned on the oven (we try not to do that very often during the summer here in AZ) and made two separate cakes. While the cakes were cooling, I went in and made Superman for Nico's cake. I thought he turned out pretty cute and Nico loved it. He loved his cake too! LOL!
This is Ayva and her pink cake with a crown. Her mom put Ariel on it for some reason.

This is Nico with his Superman cake. Again their mom put a different character than what he asked for (Spiderman this time).

I hot glued the Superman cutout to a skewer and stuck the skewer in the cake. "Superman" was layered and glued to parchment paper. Then I stuck it on top of the cake using toothpicks to hold it down over the round top.

Ayva put the crown on her cake as soon as we got there. She was so cute!

Nico eating his chocolate cake with passion.

Ayva eating chocolate cake in big bites also.

This is Ayva and her pink cake with a crown. Her mom put Ariel on it for some reason.

This is Nico with his Superman cake. Again their mom put a different character than what he asked for (Spiderman this time).

I hot glued the Superman cutout to a skewer and stuck the skewer in the cake. "Superman" was layered and glued to parchment paper. Then I stuck it on top of the cake using toothpicks to hold it down over the round top.

Ayva put the crown on her cake as soon as we got there. She was so cute!


Nico eating his chocolate cake with passion.

Ayva eating chocolate cake in big bites also.

Friday, July 12, 2013
Christmas in July - Christmas Card
I hope that you are having a great time with the Christmas in July Blog Hop. This week is Christmas cards. Don't forget to join my blog and leave a comment. There are prizes each week and a Grand Prize at the end of the month. Scrapalette's blog is the start of the hop each week. If you came here from momto2cuties then you haven't missed out on all the wonderful ideas for Christmas. If not, be sure and check out her blog. When you are finished here, check out gonescrappin' to continue with Christmas in July Blog Hop - Christmas card fun.

I couldn't make up my mind if I wanted to do a tag like last year or a card. Well, you're in luck, I went with both. First up, I used my CCR and Imagine for my Christmas tag. I used Snow Angel and it was so wonderful having the machine do all my fussy cutting for me. I started with a tag (mine was purchased but you could always cut one using the Cricut) and adhered Christmas paper to it. I then punched out the hole at the top. I inked the edges of the tag and all my fussy cuts. Next, you will want to stamp your holiday sentiment on the back (I forgot until after, didn't work so well). Then just start layering your images as you like. I like to use different thicknesses of pop dots to create depth. Make sure when you are adhering your images that your tag will fit into an A-7 envelop (5 1/2" X 7"). When you are done, run some ribbon through the hole at the top, tie it to create a loop, and sign your card. Very easy!


Next is the card. I went with a side step card and used CCR with the Imagine Santa's Village cart. Love not having to fussy cut everything.
I cut my Bazzill cardstock at 10" X 7". Along the 10" side, I scored at 2 1/2". I then turned my cardstock so that the 7" length was along the edge and the 10" length was at the top. I scored at 2 3/4" from the top to the score line, 5" from top to bottom, 6 1/2" from top to score line, 8" from top to score line, and 8 3/4" from top to score line.

I then cut my cardstock using the 2 1/2" score line as a guide from the 2 3/4" score line to the 8 3/4" score line. I hope that is understandable. If not, there are lots of youtube videos out there to help you along. I then folded the card to create the layers. Your 2 3/4" score should be a peak, 5" score a valley on the large side and a peak on the short side, 6 1/2" a peak, 8" a valley, and 8 3/4" a peak.

You need to cut a 4 1/2" X 4 1/2" piece of cardstock to adhere to the back step. I then cut a piece of scrap Christmas paper I had to accent the base card. I inked the edges of the accent paper with Stampin' Up ink. For Santa's home, I used puffy white paint and dry glitter to give it some depth. For the tree and toys I pop dotted with different thicknesses to create the depth. Santa and his reindeer were given a little ink highlights and stickles. Merry Christmas was from the Artiste cart and cut on my mini. I glued a little twine between the reindeer and Santa for the reins.


I hope my tag and card gave you a little inspiration. Please don't forget to continue with the Blog Hop. Thanks and Merry Christmas in July!
To follow along with this weeks line up, the following blogs are participants:
1~Scrapalette's (Paulette)
2~Sis O'Snap (Sis)
3~Jasper (Diane)
4~Phantom Pink Rat (Lisa)
5~Ladybug (Linda)
6~DBCMC (Donna)
7~momto2cuties (Cindy)
8~FranTimme (Fran)
9~gonescrappin' (Colleen)
10~scrapsbygracie (Theresa)
11~SeaSwan (Beth
Thursday, July 4, 2013
Christmas in July Gift Card Holder

Hi everyone, thank you for stopping by and checking out my Christmas in July Gift Card Holder. Hope you enjoyed starting this hop at Scrapalette's blog (http://scrapalette.blogspot.com). LB's blog at http://coolbeansbylb.blogspot.com should have sent you to me. If not, please don't forget to go and take a look.


The base card and accent paper were cut from the Cricut/CTMH Artiste cart, page 52, Accent 1 at
6 1/2". The base card and accent paper have two score lines. On the base card, fold the first section back at the score line and the second section forward. This gives you your flip-it/swing card.

The accent paper is cut off at the score lines for the front and back portion of the card. I did not use the accent paper on the inside fold. For the front accent paper, I cut 1/8" off the top, left side, and bottom. Ink the edges if so desired. Adhere to base card with adhesive of choice. For the back accent portion, I cut 1/8" off all four sides, inked, and adhered.


The companion shape was cut using Cricut/CTMH Art Philosophy, page 62, Oval 5 at 2 1/2". Ink edges if so desired, stamp sentiment, and adhere. To adhere the inside companion shape in its proper position, I lined it up with the design on the card, applied my adhesive, then brought the back of the card over.


The gift card holder was cut at 3 1/4" X 3". Score 1/2" on one end of the 3 1/4" side and 1/2" on both sides of the 3" side. Your gift card holder should measure 2 1/4" X 2 1/2" when finished. Trim corner pieces off near score lines and fold over. Ink edges if so desired. I attached Scor-tape to the 1/2" tabs, inserted the gift card, removed the tape backing, and adhered to the card so as not to be seen when closed.


I hope I inspired someone to make a gift card holder using the flip-it/swing cards. Now for more fun, please visit the blog of gonescrappin' at http://scrappycol.blogspot.com.
The following is a list of all the blogs participating in the gift card holder hop:
Paulette at http://scrapalette.blogspot.com/
Laura at http://www.coolbeansbylb.blogspot.com/
Fran at http://lovebugtimme.blogspot.com/
Colleen at http://scrappycol.blogspot.com/
Theresa at http://scrapsbygracie.blogspot.com/
Beth at http://seaswancreations.blogspot.com/
Betsy at http://betsymcreates.blogspot.com/
Subscribe to:
Posts (Atom)